One of the most overlooked features of BloodHound is the ability to enter raw Cypher queries directly into the user interface. Likely, a lot of that has to do with the fact that it’s not a very emphasized feature, not to mention it requires learning Cypher. However, with a bit of work, using raw Cypher queries can let you manipulate and examine BloodHound data in custom ways that will help you further understand your network or identify interesting relationships.
What is Cypher?
Just like SQL exists for MSSQL and other databases, the Neo4j graph database has its own query language: Cypher. Because Neo4j is not a relational database, but a graph database, the method of querying data requires its own syntax. Cypher is a way for a user to describe what they want to do in an intuitive manner, or as the Neo4j developers describe it, using ASCII art. On the backend, the BloodHound user interface uses Cypher to interact with the database to query data or insert new data.
Elements of the Neo4j Database
Everything in the Neo4j database is represented using common terms from graph theory, particularly edges and nodes. In the BloodHound database, a node can represent one of the following objects in an Active Directory environment:
- User
- Group
- Computer
- Domain
Nodes represent discrete objects that can be acted upon when moving through an environment. The other part of the graph is edges. Edges represent relationships between nodes. In the BloodHound database, edges represent the following relationships:
- MemberOf - Node A (a user, group, or computer) is a member of Node B (a group)
- AdminTo - Node A (a user, group, or computer) has local administrator rights on Node B (a computer)
- HasSession - Node A (a user) has a session on Node B (a computer)
- TrustedBy - Node A (a domain) is trusted by Node B (a domain)
Edges represent the actions necessary to act on nodes. Together, edges and nodes create the paths that we use in BloodHound in order to demonstrate how different permissions in Active Directory can be abused to get to our target.
Basic Cypher
When building Cypher queries, it’s important to note that you’re generally trying to build a path using the relationships available to you. Let’s look at an extremely basic query:
MATCH (B)-[A]->(R) RETURN B,A,R
Let’s break down how this Cypher query is constructed. When querying the database, we start our queries with the MATCH keyword. The MATCH clause lets you specify a pattern in the database. Each variable in the Cypher query is defined using an identifier, in this case the following ones: B,A,R. The identifier for variables can be anything you want, including entire words, such as groups. In Cypher queries, nodes are specified using parentheses, so B and R are nodes in the sample query above. Relationships are specified using brackets, so in this example A represents relationships.
The dashes between the nodes and relationships can be used to specify direction. Relationships in BloodHound always go in the direction of compromise or further privilege, whether through group membership or user credentials from a session.In the above query, the -> specifies that the query should return relationships that go from B to R. Removing the > will allow the query to search relationships in both directions. Finally, the RETURN statement instructs the database to return all the items matched with the corresponding variable names. You don’t have to return all the variables in the query if you’re only interested in some of them.
Now, let’s take our previous query and make it a bit more complex:
MATCH (n:User),(m:Group) MATCH p=(n)-[r:MemberOf*1..3]->(m) RETURN p
This query is a bit more refined than the previous one. By using labels on both nodes and edges, we can make our query a lot more specific. We also pre-assign the variables n and m and give them labels to make the query easier to read. In this particular case, we’re asking BloodHound to find nodes with the labels User and Group, and then match those nodes using the MemberOf relationship. We added a length modifier as well to the relationship. Adding *1..3 limits the search to relationships that are between one and three links. In simple terms, give me any users that are a member of a group up to three links away. Additionally, we’re assigning the result of the pattern to the variable p and returning that variable. When we get p back, it will contain the result of each path it can find that matches our pattern we asked for.
Now that we’ve looked at the basic building blocks of queries, let’s look at a more complicated one. As an example, here’s the query we use to calculate shortest paths to Domain Admins, one of the most important queries in the BloodHound interface:
MATCH (n:User), (m:Group {name: "DOMAIN ADMINS@INTERNAL.LOCAL"}), p=shortestPath((n)-[*1..]->(m)) RETURN p
In this query, we add a few more elements to our previous ones. We still use labels to specify our nodes, but we also add another degree of specificity to our group node by restricting the group nodes that can be returned to only the DOMAIN ADMINS@INTERNAL.LOCAL by specifying the name parameter. We also use the shortestPath function. Using this function, we ask Neo4j to give us the shortest path it can find between each node n and the Domain Admins group. Because we didn’t specify any relationship labels, the query will use any possible relationship it can find. We also removed the limit on how many hops the database can search. By not specifying an upper limit, the database will go as many hops as possible to find a path.
There is also an allShortestPaths function available, which as the name implies, will find every shortest path from each node to your target. Note that this results in significantly more data being returned and frequently isn’t something we need. On the BloodHound interface, shortestPath is used in most cases, with the exception being a direct path query between two nodes using the pathfinding function.
Another important part of Cypher to note is that wildcard matches are possible using regex, although the syntax for the query changes slightly. As an example, here’s the query that’s run each time you type a letter in the search bar:
MATCH (n) WHERE n.name =~ “(?i).*searchterm.*” RETURN n LIMIT 10
This is a straightforward query. We ask Neo4j to return any nodes of any type that match the search term given. The ?i tells Neo4j this is a case insensitive regex, with the .* on each side indicating that we want to match anything on either side. We limit the number of items returned to the first ten using the **LIMIT** keyword.
Advanced Concepts
As you start building into more complicated queries, the WITH keyword will start to become important. The WITH keyword allows you to use multiple queries and pass the results of each query to the next step. An example of this is in the BloodHound interface whenever you click on a group node. One of the pieces of data in the node’s data display is the number of places where users in this group, as well as subgroups, currently have sessions. The UI calculates the number of sessions for the group using two separate queries put together:
MATCH p=shortestPath((m:User)-[r:MemberOf*1..]->(n:Group {name: {name}})) WITH m MATCH q=((m)<-[:HasSession]-(o:Computer)) RETURN count(o)
This query looks more complicated than what we had before, so let’s break it down into its two components.
MATCH p=shortestPath((m:User)-[r:MemberOf*1..]->(n:Group {name: {name}}))
This is the first query we run. We ask BloodHound to find the shortestPath possible from any user node to the group we specify. Note that we allow the MemberOf relationship to span any number of hops, allowing us to include users inside nested groups. This first query gives us all the effective members of the group we ask for.
MATCH q=((m)<-[:HasSession]-(o:Computer)) RETURN count(o)
This is the second query that actually gives us the session data. The variable m is carried over from the previous query and contains all the users relevant to the group we’re attempting to find sessions for. We ask BloodHound to find any computer where any of the users we found in the first step has a session using the HasSession relationship. We’re not interested in returning the relationships in this particular case, so we don’t assign a variable. Finally, we return the count of the number of computers we have sessions on. The two queries we execute are joined together using the WITH keyword. When using the keyword, you specify any variables you want to carry over from the previous part of the query. These variables will be available with the data for the next query in your chain.
Building On Top
Now that we’ve explained Cypher and the syntax, as well as all the cool ways you can narrow down search results, the next step is to build some new and interesting queries and start examining how you can view relationships. A quick way to start looking at Cypher queries is looking through the BloodHound code to see the different ways Cypher is used throughout queries. You can find a several examples just in the pre-built queries section of the user interface, the code for which can be found here.
Additionally, if you find queries you like, BloodHound provides a simple way to add custom queries and save them into the Pre-Built Queries section of the UI.
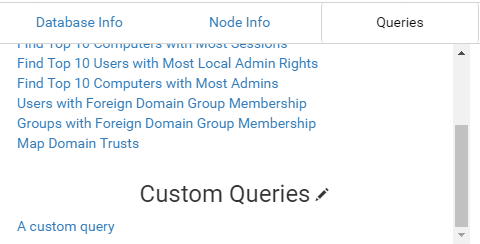 {: .center-image}
As of BloodHound v1.2, a JSON file is saved in the Electron user directory associated with BloodHound. You can edit the file by clicking the crayon next to Custom Queries on the UI, which will ask your OS to open the file in whatever your default is. On Windows, the file falls under AppData\Roaming\bloodhound. Anything in this file will be loaded into the BloodHound user interface whenever it initializes.
The syntax of the JSON file is a bit strange, so let’s take a look at the two different types of query you can save in the UI. The first type is a simple query that doesn’t require any user input, such as searching for nodes with a preset name. Let’s look at the Find All Domain Admins query as an example:
{
    "queries": [
        {
            "name": "Find all Domain Admins",
            "requireNodeSelect": false,
            "query": "MATCH (n:Group) WHERE n.name =~ {name} WITH n MATCH (n)<-[r:MemberOf*1..]-(m) RETURN n,r,m",
            "allowCollapse": false,
            "props": {"name": "(?i).*DOMAIN ADMINS.*"}
        }
    ]
}
The intro tag for the JSON is “queries,” which corresponds to a list of the queries you’re interested in. For the simple queries, only a few pieces of data are required:
- name - The name of the query to display on the UI
- requireNodeSelect - Setting this to “false” designates this as a query that does not require user input
- allowCollapse - Setting this to “false” will prevent the UI from collapsing nodes when running this query, logic which is used to minimize the number of nodes drawn on screen
- query - The actual query to run.
- props - Properties to pass into the query
It’s important to note that properties, such as names, should not be passed directly into the query, but as properties. In this example, we add {name} into the query. This corresponds to the appropriately named parameter in the props object. Using properties this way ensures that escaping of strings is done properly when sending the property data to the database.
The second, more complicated query is a query that needs user input of some sort. The pre-built query is structured with two different queries this time. Let’s look at the BloodHound “Shortest Paths to Domain Admins” query
{
    "queries": [
        {
            "name": "Find Shortest Paths to Domain Admins",
            "requireNodeSelect": true,
            "nodeSelectQuery":  {
                "query":"MATCH (n:Group) WHERE n.name =~ {name} RETURN n.name",
                "queryProps": {"name":"(?i).*DOMAIN ADMINS.*"},
                "onFinish": "MATCH (n:User),(m:Group {name:{result}}),p=shortestPath((n)-[*1..]->(m)) RETURN p",
                "start":"",
                "end": "{}",
                "allowCollapse": true,
                "boxTitle": "Select domain to map..."
            }
        }
    ]
}
This query has more properties to it:
- name - The name to display on the UI
- requireNodeSelect - We set this to “true”, this time to indicate we’re doing a more complicated query with user input
- nodeSelectQuery - This JSON object contains all the actual query data
- query - The query to be run to get user input
- queryProps - Properties to pass to the user input query
- onFinish - The query to run with your user input. Note that we use the keyword result in order to slot in our user input. This is important, as this is the name of the property passed into the onFinish query
- start - The name of the start node of the query. By passing in {} the result of user input will be substituted there.
- end - The name of the end node of the query. By passing in {} the result of user input will be substituted there.
- allowCollapse - Setting this to “false” will prevent the UI from collapsing nodes when running this query, logic which is used to minimize the number of nodes drawn on screen
- boxTitle - The title of the user input box that will be displayed
The result of this pre-built query gives you this:
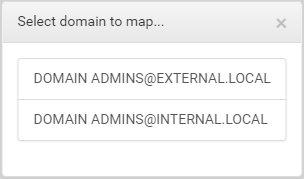
Whichever one of these options is selected by the user will be passed into the onFinish query and the result will be displayed on the user interface. These two options let you make simple or complicated queries that can be persisted in the user interface. Because the queries are saved in your customqueries file, even when BloodHound updates, the queries will still be available to you for use.
Debugging
Debugging Cypher queries can be an interesting process. There’s two options you can take while trying to debug these issues. The first is to stick with the BloodHound user interface. BloodHound is running in Electron, which has the Chrome developer console built in. You can use the console by using Ctrl + Shift + I on Windows/Linux, or Cmd + Shift + I on Mac. Any errors in the Cypher query will be output to the console when you send it to the database and it responds back.
The other option you can use is to use the Neo4j console itself. By default, you can access the console by opening up your browser and going to http://localhost:7474, assuming that you’re running the database on your local system. You can test your Cypher queries in the console, and likely get your errors back in a much easier to read manner.
Wrap Up
Once you start thinking using the query language, you’ll find that it’s not quite as complicated as it initially seems, and the user interface provides you with a convenient method of using these queries with the Raw Query input at the bottom.

Put this all together, and you have an easy way to expand the user interface to suit your purposes, and to come up with more interesting analytics. By combining different queries and patterns, you can come up with interesting analytics, such as determining where two sets of users intersect with sessions to identify high priority machines to target when pursuing a particular goal. And if you come up with an amazing new analytic that you want to share, you can always put a pull request on the GitHub repo, or join us in the BloodHound slack channel. If you’re not currently part of the channel you can get yourself an invite here.